Easy Appointments is a flexible and user-friendly WordPress plugin designed for managing appointments efficiently. It allows businesses to schedule and manage bookings, assign services to staff, and customize time slots. With seamless integration options and customizable settings, it is ideal for service-based businesses such as salons, clinics, and consulting firms. This guide will walk you through the installation and configuration process to help you set up the plugin effortlessly.
Installation #
The installation process for the Easy Appointments plugin is simple:
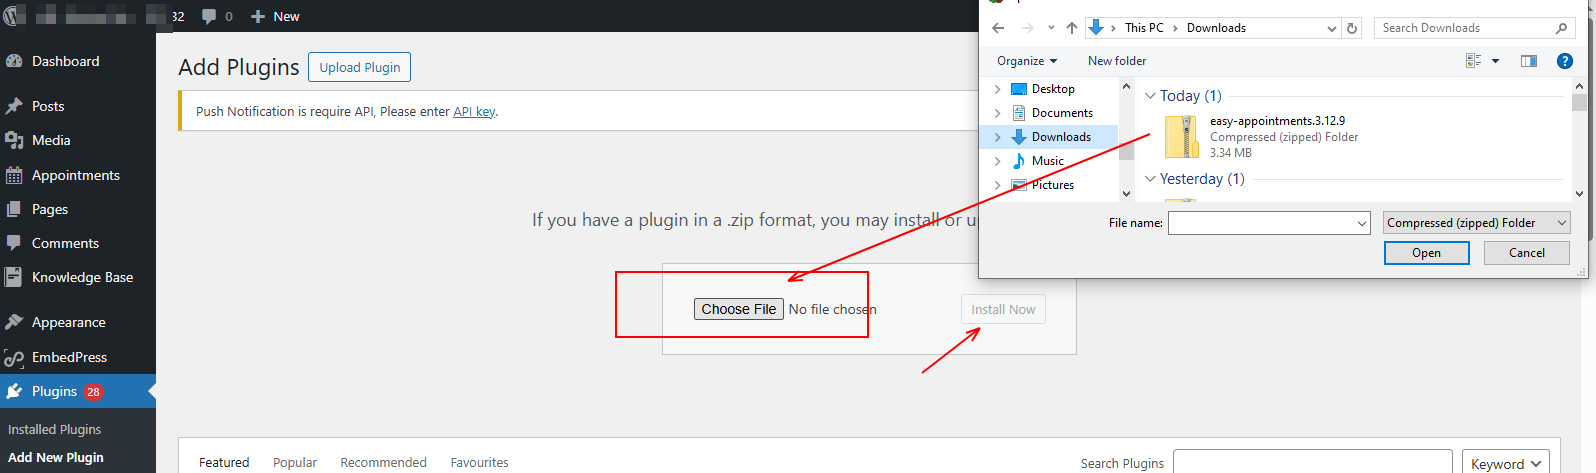
- Download the plugin ZIP file from here : https://wordpress.org/plugins/easy-appointments/
- Log in to your WordPress admin panel. Go to Plugins and click on the Add New.

- Click on Upload Plugin at the top, then click Install. Once the installation is complete, click Activate. Finally, refresh the page to ensure the plugin is properly installed.

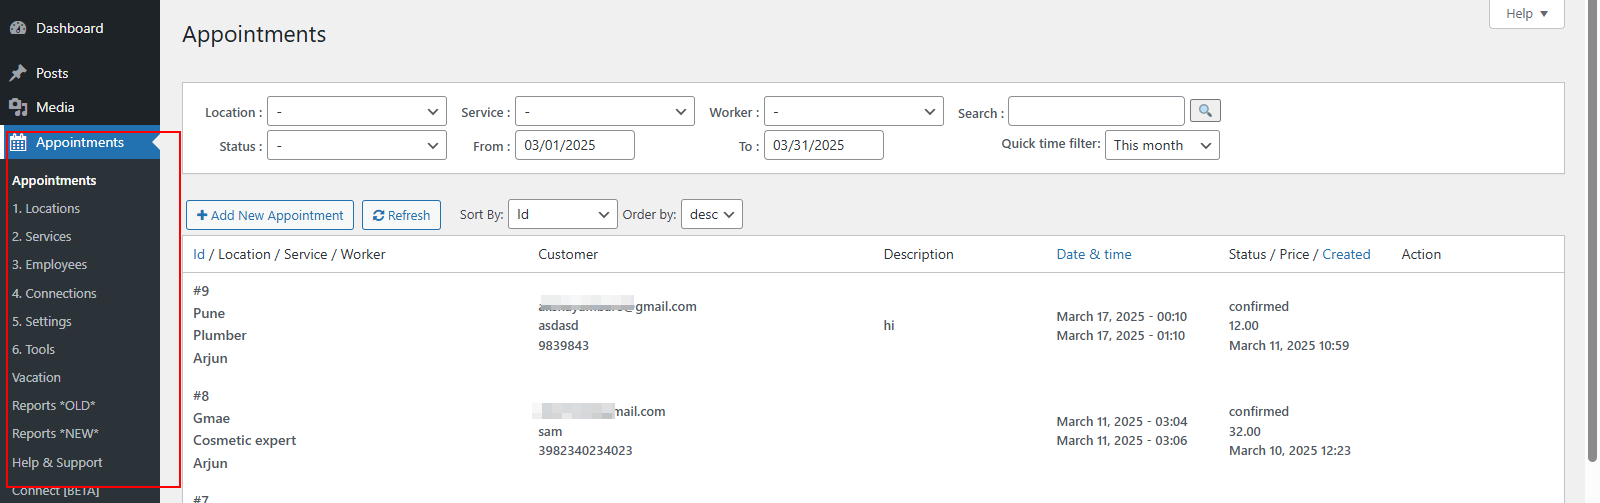
Settings #
Once the plugin is installed, you will see a new menu item Easy Appointments in the WordPress admin panel. To configure the plugin:
- Define at least one location. Click on Add location, add all the details and save it.

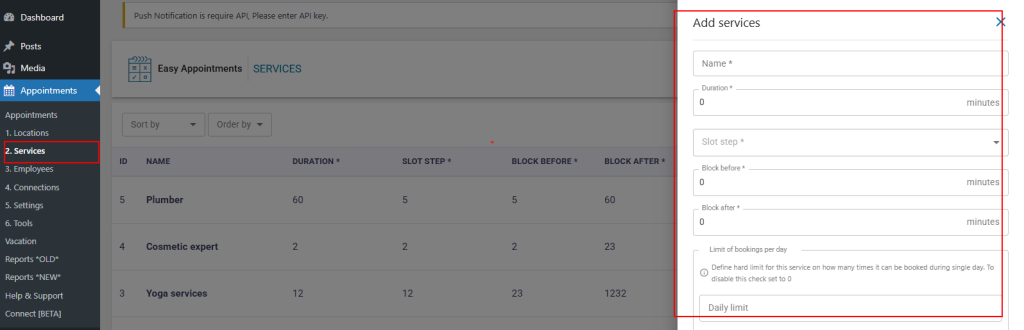
- Define at least one service. Click on the Add services, fill all the details and save it.
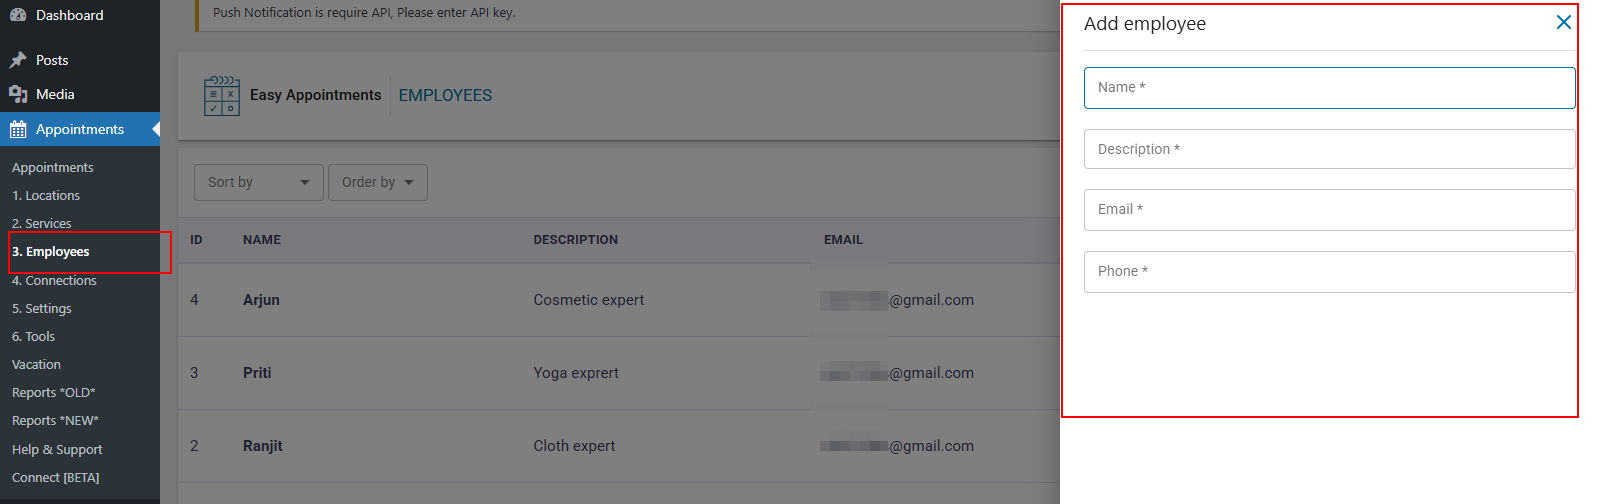
- Define at least one Employee. Click on the Add Employee, fill all the details and save it.
After setting up these elements, you need to create Connections. A Connection represents a single working slot for a specific Location-Service-Worker combination. You can create multiple connections for the same combination if you need additional time slots.
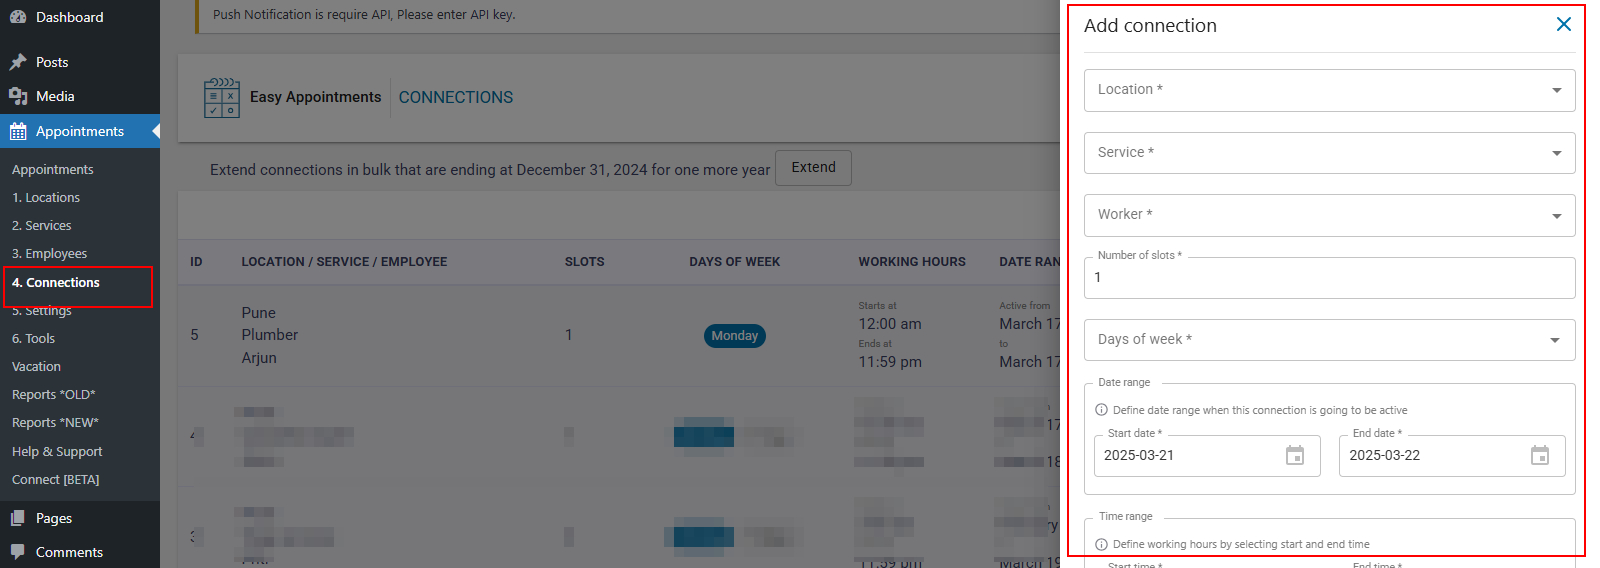
- For example, if you want two slots at the same time, simply duplicate an existing connection and adjust the time.
- Since version 2.10, a slot count option is available, allowing you to set the number of slots per connection instead of duplicating them.
⚠️ If at least one Location, Service, and Worker are not connected, no available time slots will be shown, preventing users from booking.
For Services, you must specify the duration (in minutes) and the slot step time. The duration divided by the slot step time must be a whole number (e.g., a 60-minute service with a 20-minute slot step: 60/20 = 3).
Time Management #
To define available appointment slots, you must create connections between Location, Service, and Worker. Each unique combination forms a slot or capacity unit.

- To increase available slots, duplicate the connection.
- To reduce available slots, clone a connection and mark it as Not Working.
Customization #
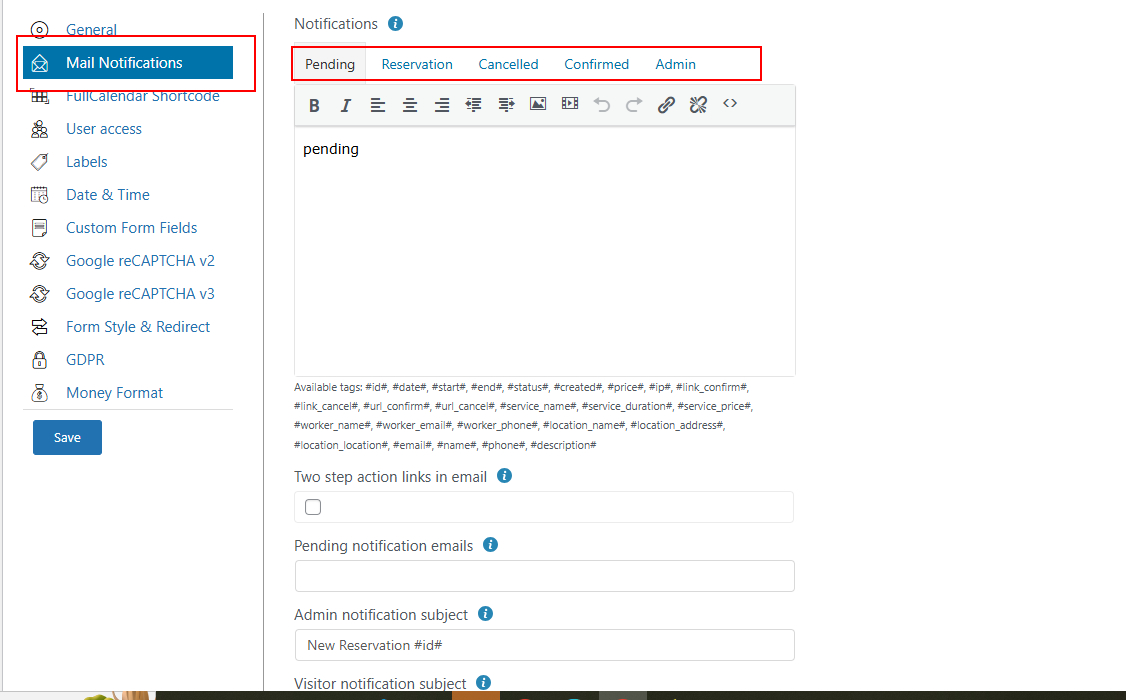
In the Settings tab, you can configure:
- Email notifications (Pending, Reservation, Cancelled, Confirmed).
- Label translations.
- Time format settings.
- Currency settings.
This steps helps you to install, configure, and customize the Easy Appointments plugin efficiently.
Short-code #
If you completed all settings you can move to insert front-end part of plugin on page or post that you selected.
In order to place plugin widget for creating appointment on your page, you need to place short-code to that page :
Standard form #
[ea_standard]Options:
| Name | Description |
|---|---|
scroll_off | turn off scroll {true, false}, default value “false” |
default_date | Set default date on calendar that will be selected when customer opens the form. Default value is current date. Date format YYYY-MM-DD example : 2017-12-31. Also you can set time formula like set default day 5 days from now +5d or next week +1w etc. |
min_date | Set min date on calendar that can be selected during booking process by customer. Default value is 0. Date format YYYY-MM-DD example : 2018-12-31. Also you can set time formula like set default day 5 days from now +5d or next week +1w etc. |
max_date | Set max date on calendar that can be selected during booking process by customer. Default value is null, no upper limit. Date format YYYY-MM-DD example : 2018-12-31. Also you can set time formula like set default day 5 days from now +5d or next week +1w etc. |
show_remaining_slots | show remaining slots {“0”, “1”}, default value “0” – since version 1.11.6 |
show_week | show week number in calendar {“0”, “1”}, default value “0” – since version 2.3.11 |
Example :
Bootstrap version – responsive layout #
Or for responsive bootstrap version (from v1.2.0)
[ea_bootstrap]For bootstrap there are additional options :
| Name | Description |
|---|---|
width | value {000px}, default value “400px” |
scroll_off | turn off scroll {true, false}, default value “false” |
layout_cols | value {1,2}, default value 1 |
location | predefined location, value {id number of location}, default value null |
service | predefined service, value {id number of service}, default value null |
worker | predefined worker, value {id number of worker}, default value null |
rtl | Use right-to-left label position, value {0, 1}, default value 0 |
default_date | Set default date on calendar that will be selected when customer opens the form. Default value is current date. Date format YYYY-MM-DD example : 2017-12-31. Also you can set time formula like set default day 5 days from now +5d or next week +1w etc. |
min_date | Set min date on calendar that can be selected during booking process by customer. Default value is 0. Date format YYYY-MM-DD example : 2018-12-31. Also you can set time formula like set default day 5 days from now +5d or next week +1w etc. |
max_date | Set max date on calendar that can be selected during booking process by customer. Default value is null, no upper limit. Date format YYYY-MM-DD example : 2018-12-31. Also you can set time formula like set default day 5 days from now +5d or next week +1w etc. |
show_remaining_slots | show remaining slots {“0”, “1”}, default value “0” – since version 1.11.6 |
save_form_content | auto fill customers form with previous data {“0”, “1”}, default value “1” – since version 2.3.4 |
show_week | show week number in calendar {“0”, “1”}, default value “0” – since version 2.3.11 |
cal_auto_select | Auto select day in calendar if it is the first step in form {“0”, “1”}, default value “1” – since version 2.13.4 |
auto_select_slot | Auto selection of single availalbe slot in selected day. Options {"0","1"} Default value "0", Since version 3.11.12 |
auto_select_option | Auto selection of single availalbe option (location/service/worker). Options {"0","1"} Default value "0", Since version 3.12.4 |
block_days | list of days that you want to block YYYY-MM-DD like this “2020-07-31,2020-08-01”, default value null – since version 3.0.2 |
block_days_tooltip | Tooltip for blocked days, default value “” – since version 3.0.2 |
select_placeholder | Select label placeholder of Location, Service and Worker select field, default value “-” – since version 3.0.5 |
Example :
Two column layout with fix width
Set predefined values for location / service / location
In future there will be more than one short code for different style and layout of front-end part of plugin.
FullCalendar view #
Note under development, documentation will change! Soon there will option for each employee to have overview of all appointments made for them with detailed view.
| Name | Description |
|---|---|
location | predefined location, value {id number of location}, default value null |
service | predefined service, value {id number of service}, default value null |
worker | predefined worker, value {id number of worker, or string value logged}, default value null. If you add logged then current user will be able to see only his/her events except in case of user with manage_option capability. |
views | Available views for calendar. Default: month, basicWeek, basicDay |
default_view | Default views for calendar when opened. Default: month |
default_date | Default selected date for calendar when opened. Default: YYYY-MM-DD current day. |
show_remaining_slots | show remaining slots {"0", "1"}, default value “0”. |
show_week | show week number {"0", "1"}, default value "0". |
day_names | Day labels. Default: Sunday,Monday,Tuesday,Wednesday,Thursday,Friday,Saturday |
day_names_short | Day labels short version. Default: Sun,Mon,Tue,Wed,Thu,Fri,Sat |
month_names | Month labels. Default: January,February,March,April,May,June,July,August,September,October,November,December |
month_names_short | Month labels short version. Default: Jan,Feb,Mar,Apr,May,Jun,Jul,Aug,Sep,Oct,Nov,Dec |
button_labels | List of button label to customize. Default: "today,month,week,day,list". Make sure to follow order of labels and to provide all values. |
time_format | Time format, for example "H:mm". Default: "h(:mm)t" |
month_header_format | Time format, for example "MMM YYYY". Default: "MMM YYYY" |
week_header_format | Time format, for example "MMM DD". Default: "MMM DD, YYYY" |
day_header_format | Time format, for example "MMM DD". Default: "MMM DD, YYYY" |
display_event_end | Display end time next to start time {"0", "1"}. Default: "0" |
color | Use service color to show events on calendar. Options {"service"} |
Statuspendingconfirmedreservationcancelled
- to see all appointments for that particular logged in worker.Statuspendingconfirmedreservationcancelled
Appointments status #
Created Appointments can have status from next list :
- Reservation – When customer creates Appointment select date and time value it will automatically create reservation on back end. But only if option Auto reservations is marked.
- Pending – When customer fill out the form status will change form Reservation to Pending.
- Confirmed – After admin click to confirm Appointment or that is done by customer status will change from Pending to Confirmed.
- Abandoned – This status will have Appointment when customer clicks on cancel button at end of form. But only if Auto reservations is marked.
- Canceled – If customer or admin cancel Appointment status will change to Canceled.
GDPR – EU data protection #
Since EasyAppointments version 2.3.1 there are special options for getting consent from user regarding GDPR and data protection EU act. You can define custom checkbox in customers form with custom Label, custom Error message if field is not marked and custom Link to dedicated page where you can put more details about data protection on your site.
Tracking (Google Analytics) #
There is a call back event when customers create an Appointment. By simply hooking on that event you can add additional tracking service code. Name of event is easyappnewappointment. Here is an example how to do that for Google Analytics :
<script>
document.addEventListener( 'easyappnewappointment', function( event ) {
ga('send', 'event', 'New Appointment', 'submit');
}, false );
</script>
Reports #
Time table report is showing all slots ( free – taken) for whole month. There you can track if your time settings is OK. Time table also helps to quickly see what is next free slot is for that location – service – worker connection.
Export – allows you to export you data to CSV format that you can use to import it to MS Excel or OpenOffice Calc. You can specify date range for the export appointments. Fist row in export file contains column names.
Currently there are only two reports but new are coming.
Translate #
Easy appointments plugin supports translation. You can translate some labels via settings page but if you want to translate all labels you must create your own translation file. This can be done by external application (Poedit) or even inside WordPress admin panel via translate plugin (Loco Translate, GTranslate, WPML, …).
If you want to keep your translations even if plugins updates do the following thing. Copy edited translation files into: wp-content/languages/plugins that will prevent overriding during updates.
Extension – Plugin #
Google Calendar #
Before Easy Appointments Extension start with syncing the appointments with Google Calendar it is necessary to provide App data (cliend id and secret) and after it allow access to Calendar and retrieve the Access token
Here is tutoral on how to set Google Client Id and Client Secret and obtain the Access token. Video is old but still relevant as tutorial for Google Calendar settings :
Make sure that you have valid email address for employee (worker) also email address of customer must be valid as well. Wrong value for email will lead to error during upload on Google Calendar!
Make sure that time zone is the same on both ends! Time zone in WordPress Admin page must be set to Name value instead of “+2 GMT” like value!
Options #
| Name | Description |
|---|---|
Event subject | Subject of Event in Google Calendar. In this field you can use custom tags to store additional value in Google subject field inside of Event |
Default location | Location for Events that are created on Google Calendar and synced back to Easy Appointments |
Default service | Service for Events that are created on Google Calendar and synced back to Easy Appointments |
Sync data for next `X` days | Send sync request for events that are within `X` days on Google Calendar. This options allow fine tune for amount of data that will be processed during each import cycle |
Sync interval | how often to run sync with Google Calendar, in minutes. |
Advanced Calendars sync | here you can connect multiple Google Calendars by selecting the Calendar and default values for Location, Service and Employee. Only writable calendars are going to be listed there. This option is available from 0.7.0 version, so you can have for example separate Google Calendars for separate service / location / employee. |
Twilio #
You can use Twilio as SMS service to notify you customers and send reminder for Appointment.
Options #
| Name | Description |
|---|---|
Account SID | Twilio account ID. (Account that will be used for billing) |
Authtoken | Access token for that Account. |
Phone field | Mark field that is carrying the Phone data from customer. |
Send from | Phone number that will be in Send from field. (you can buy phone number on Twilio or transfer your current one) |
SMS Template | Template that will be used for sending the SMS notification to Customer. If you want to skip sending SMS for some statuses just save the empty value for it. Here you can use all tags available in email notifications.#id#, #date#, #start#, #end#, #status#, #created#, #price#, #ip#, #link_confirm#, #link_cancel#, #service_name#, #service_duration#, #service_price#, #worker_name#, #worker_email#, #worker_phone#, #location_name#, #location_address#, #location_location# with custom fields tags. |
Send SMS reminder | When do you want to send SMS reminder for customer. |
WooCommerce #
First thing is to create connection between Easy Appointments Service and WooCommerce Products. After that is done visitor can have Product added to chart as soon as the Appointment has been created.
You can set redirect page after creating appointment to Cart or Checkout, Go to page option is inside Settings > Customize.
iCalendar #
You can send ICS file with every customer notification so the user can import Appointment to own Calendar. This is possible because ICS files are accepted by mail client allowing importing Appointment to their Calendar at one click! For example here is how GMail show that option :

Options #
SummarySummary, you can use tags in order to customize content : #id#, #date#, #start#, #end#, #status#, #created#, #price#, #ip#, #link_confirm#, #link_cancel#, #service_name#, #service_duration#, #service_price#, #worker_name#, #worker_email#, #worker_phone#, #location_name#, #location_address#, #location_location# with custom fields tags.File nameFile name of ICS file that will be part of customers email as attachment.
| Name | Description |
|---|---|
Send ICS file | Mark this option if you want your customers to receive ICS file along notification email. |
Description | Appointment description (Title), you can use tags in order to customize content : #id#, #date#, #start#, #end#, #status#, #created#, #price#, #ip#, #link_confirm#, #link_cancel#, #service_name#, #service_duration#, #service_price#, #worker_name#, #worker_email#, #worker_phone#, #location_name#, #location_address#, #location_location# with custom fields tags. |
PayPal #
If you want to use paypal checkout before making appointments for your customers first thing is to create a PayPal application inside your PayPal account. That can be done in couple of clicks. After that copy Production (live) ID and select mode production.
You can choose if you want payment to be mandatory or optional.
Also you can allow Payment via Credit or Debit Card.
Here is example of mandatory version : DEMO and how to setup PayPal documentation page.
Available shortcode options:
| Name | Description |
|---|---|
use_paypal | Should place PayPal button. Values : {“0”, “1”} |
allow_card | Allow Credit Cards. Values : {“0”, “1”} |
only_cards | Show only cards. Available since version 1.1.0. Must be combined with smart button. Values : {“0”, “1”} |
paypal_smart_button | Use Smart button version (preferred) . Values : {“0”, “1”} |
example: